On this page:
-
- Accessing Menu Management through the Customizer
- Selecting a Menu to Edit
- How the Menu is Organized
In this section:
9.1. Editing Menus
9.2. Create a New Menu
9.3. Duplicate a Menu (not yet available – being tested!)
Accessing Menu Management through the Customizer
- The menu editing system can be found on the left sidebar menu of your Dashboard, under Appearance > Customize.
- When the new sidebar pops up, select Menus.
- Select the menu you want to update: remember, the Main Menu is the bar at top of the public view of the website. Your menu however may be named differently.
- Or, choose whichever one you are working on — but note that only the “Primary Menu” can be previewed in the live update window.
Selecting a Menu to Edit
- Note: while several menus are listed, only one is
(Currently set to: Primary Menu). This is the one that is active on your LibPress site as the Main Menu. Only the Primary Menu can be viewed in the Customizer as you edit it. - To change the Primary Menu: select the one you want and scroll to the bottom–here you can select the Menu Locations.
- Note that the Footer Menu acts as a site map and appears at the bottom of the website (sometimes it does not appear if you have opted to remove this from your site.)
How the Menu is Organized
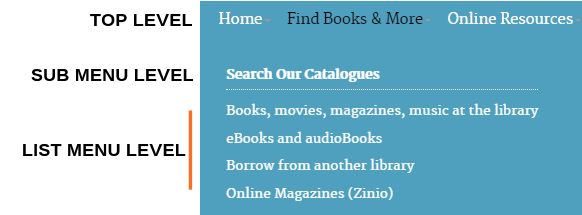
The menu view displayed shows a vertical representation of what you see horizontally on the website.

There are three levels: Top Level, Sub Menu and the List Menu. The levels are visually represented by their indent location.
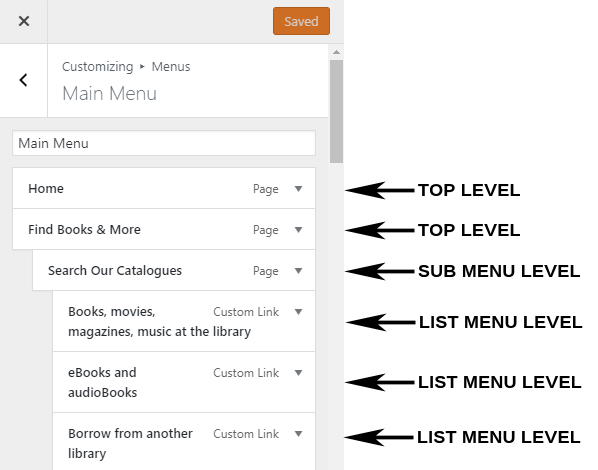
On the website the levels a similarly represented.
NOTE: You generally want to keep the number of items per level as follows:TOP LEVEL = 6-9 (Make sure the labels on the Top Level or Main Menu bar are short!)SUB MENU LEVEL = 3-4LIST MENU LEVEL = 0-10