LibPress offers a registration “ticket” system to The Events Calendar (TEC) for a nominal annual fee. Looks great and works well on mobile devices. To see how the RSVP and a Waitlist would look on an Event page, check out our demo Maple site example! (Note that this service does not include a payment system.)
On this page:
- How the registration form works
- Note about Recurring Sets of Events
- Create RSVP form
- Collect Attendee information
- Manage Ticket Fieldsets
- Manage Attendees
- Events manager profile
How the registration form works
- Create a RSVP registration form for individual events, where patrons select how many “tickets” they need and also enter their email address. Further information can be collected, for instance for children’s events where you can request guardian contact information, allergy notes, etc.
- Set a capacity limit for an event, and when this is reached the RSVPs close; at this point you could create a new ticket type for “Waitlist” which would appear below the Closed RSVP box on the Events page.
- Confirmation emails are automatically sent to patrons who have registered (or if they signed up for the waitlist).
- Staff can review the Attendee information from the Events Admin view, cancel registrations, and more.
- Easily move a guest from the Waitlist to Guest list of Attendees, then generate an email to notify the guest about the change.
- Generate a list of all Attendee information to print out, or copy email cells to paste into To: field of email to update your attendees about any last minute information, such as a cancellation.
Note about Recurring Sets of Events
RSVPs can’t be applied to recurring sets of events, meaning that you can’t apply the RSVP form and have it automatically be applied to all events in that set. You will also see a TEC generated note about payment streams, which you should ignore. However, there are multiple strategies of handling Series and RSVPs.
To create a series of events with a single registration form for all events
- Create a recurring set of events, and then a standalone single event that acts as a registration for the entire series. Create a link to that standalone event and add this to your Series page indicating that the library attendee can register once for all events.
To create a set of events each with its own RSVP form:
- Create an individual event and duplicate it (find the Duplicate in the Publish box at top right). Make sure you attach your initial event to the appropriate series, as this will be copied over. However, forms will NOT be copied over, and yes you will have to set it up individually for each one (TEC is working on this and may be a future feature). Note that issues can arise when duplicating an event with a form that already has attendees.
- Or if you have already created a set of recurring events and decide after to add RSVP forms to these, you will find you don’t have that option when trying to edit an event. In this case, go to the Series page, and scroll down to see the attached events. You will see “Convert to single” as an option next to the events. Click this and add your form. You would need to do this individually for each, however this may be preferable to set up registration closer to each event date.
Create RSVP form
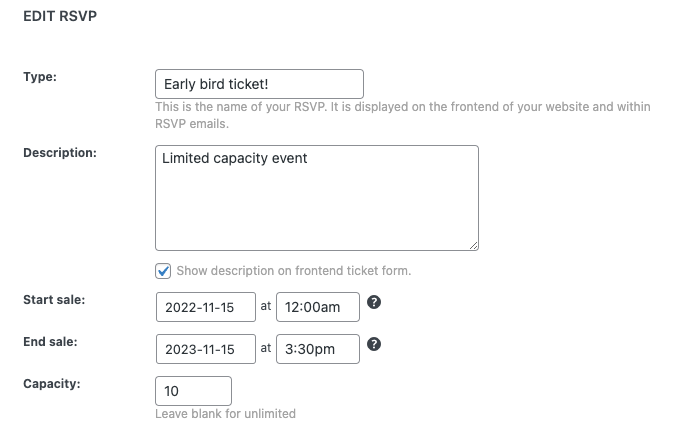
- Type is a setting to apply a unique name for the ticket type, especially if there is more than one type eg. Registration, Wait List etc.
- Description adds text to the ticket area (“bring waterproof jackets”, or, “children must be accompanied by an adult”).
- Start sale dictates when the RSVP becomes available–by default sales will start when you publish the event.
- End sale does the reverse – you can set this to a date after which users will not be able to RSVP–the default is to stop sales when the event itself starts. Optional.
- Capacity is the number of tickets that are available; if this is left blank then there is no limit.
Collect Attendee Information
Note that the RSVP already collects Name and Email!
Click on Attendee Information at the bottom of the RSVP form in Edit view to open up a tool to create customized fields:

See that little note at the bottom? “Save this fieldset…” That allows you to save your created form for future events!
Manage Ticket Fieldsets
Fieldsets are the forms that you create to collect information from your attendees–these can be saved as above (immediately above the header for this section is a screenshot of the area where you would save it).
To manage the fieldsets, and delete any no longer in use, find Tickets on the left hand sidebar and click on Ticket Fieldsets.
Manage Attendees
The attendee list is a report of all ticket purchases and RSVP registrations for an event.
Multiple ways to access the Attendee list are from the Events list in Dashboard view; from within the RSVP box in the Events page editor, and from the top black administration navigation bar (when logged in as a Site Manager).