This page discusses Alt Text and how to add this text to media files in the LibPress template, and best practices. Consider also applying these rules to social media images.
Images on their own do not convey information beyond the visual. If the image is included because it complements the text, or even adds clarity to the overall content on the page–people with visual disabilities are unable to access this visual information. If using a screen reader, adding alt text will allow for the user to access this information.
Alt text is also helpful for assistive screen readers or browsers with images disabled. If a browser can’t display the image, the alt text may be displayed instead.
Note that alt text is different from a “tool tip” which is a Title attribute defined in HTML tags, that pops up when the cursor hovers over the labelled text. Alt text is only meant to be read by assistive technologies, and doesn’t otherwise appear on a page. Use an Accessibility Checker tool like Sa11y to doublecheck that your alt text is correctly entered.
Adding alt text to images

When adding an image to your Page
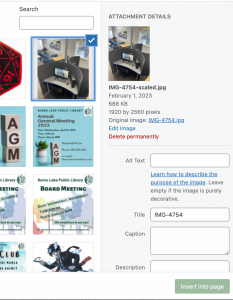
You can add the Alt Text right at that time when you select the image from the Media Library.
- Click on the image you want to insert in your page
- At the right you’ll see a sidebar where you can add Alt Text. Although the instructions to say to leave this blank if the image is merely decorative, it is more useful to the reader if you include a description anyways and state that is for decorative purposes. (Better yet, just don’t use images unless they add meaning to the text on the page.)
- Also, edit the Title, which is the image filename; by changing the title to something more meaningful you increase accessibility.
- Search engines also crawl through the text of alt text and titles and so this increases your SEO or Search Engine Optimization. (Generally, anything you do to adhere to design best practices for accessibility will increase the SEO, so don’t worry too much about that aspect for your site.)
When editing your Page with an image

Anytime you review a page for relevancy/currency, check your images for alt text. To add alt text to an existing page with image:
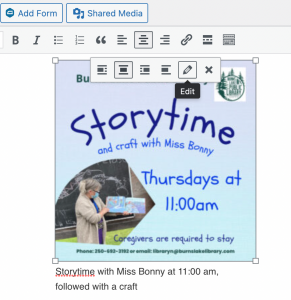
- Go to the Page Visual editor, and click the image.
- A floating task toolbar will appear: select the edit “pencil”
- You’ll be taken to an editing page for the image where you can add alt text and a caption if you wish, however you can’t change the filename here.
- Note the poster at the right: there is a lot of text that is important information for the library patron. A great poster for the wall, however it would be better not to create a text-heavy image as the screen reader cannot read this, since it is just an image. Including all the text in an “alt text” is also not appropriate, and would be best as text read separately from the image. See Best Practices below.
Best Practices for Images and Alt text
Use of images
Before adding an image to your page, consider the following:
- Does it add value to the content?
- Is the content just as effective without an image?
- Would white space be a better option?
- Has consent been obtained for any images (photos) of people? — Check your policies around photographing and publishing library events.
- Do you have copyright permission to use the image? — You should respect this! If anyone should, its us in the library community!
- Special note about icons: not every icon is immediately recognizable to different communities, cultures, etc. Try to avoid things like a letter to refer to email, since these are actually two different concepts. Another example is a musical note to indicate sound–not all cultures use the same notation for their music.
Image creation
- Create clear, high contrast images that add value to the page.
- Avoid decorative images that add clutter — these are obstacles to a screen reader, and also create difficulty for persons with low visibility using your website.
- Don’t include a lot of text embedded in the image. Add the valuable contextual information as actual text on the screen that can be read by a screen reader.
Alt Text description
- Generally not meant for long descriptions, so stick to about 125 characters. Longer explanatory text should accompany the image in the page.
- Capture any text in the image, such as “Lego Time” in your alt text — so, if you have too much text in your image, your alt text will likely be much longer than recommended.
- Be concise when describing the image, using short descriptive terms.
- Describe the image, then state what its purpose is related to the content on the page.
- Use readable sentence structure, not a series of keywords.
- If you’re struggling to describe it, think how you would describe it to someone over the phone.
- If you use a caption, do not use the same text in the alt text, otherwise a person listening to the page will hear the same information twice over their screen reader.
Complex images (charts, illustrations, graphs, etc.)
There are a few ways to handle complex images.
- Describe all the relevant details in the accompanying text.
- Link the image to a “longdesc” (long description) of an explanatory page.
- Example: <img src = “graph.gif” longdesc=”graph.html” alt=”3D pie chart of funding statistics” />
- Complex images tutorial (W3C)
More resources
Guide to Image Descriptions – a quick overview of how to create good alt text, summarized by AccessibleLibraries.ca from a NNELS resource
Access Ability 2: A Practical Handbook on Accessible Graphic Design – overview by AccessibleLibraries.ca, this is a handbook created by The Registered Graphic Designers (RGD) in collaboration with the Government of Ontario. More information than the regular site manager would need, but interesting for those who are working in desktop publishing and communicaitons. Link to download provided.
